The SMTP protocol used to transport emails does not provide any way of verifying the sender address of an email. In principle, sender addresses can therefore be falsified and recipients cannot know who an email really comes from. This facilitates attempts at fraud, spam, phishing and the like.
DKIM was developed to be able to check whether an email really comes from the specified sender (From: header). The protocol provides for a check at domain level, so it is up to each sender domain itself to decide whether and which mechanisms it provides to prevent forgeries within the sender domain. As a recipient, you can therefore only rely on DKIM to ensure that the domain is correct, but not the address within the domain.
With DKIM, the sender's email server adds a digital signature to every email sent and inserts it in an additional header (DKIM-Signature:). At the same time, the public key used to create the signatures is published in the domain's DNS entry. Each recipient can now check whether the email has really been signed with the correct key. This works independently of the sender's server. The email can therefore be sent or forwarded via any server without affecting the verification.
In principle, each sender can decide for themselves whether or not to sign their emails with DKIM. This allows a gradual introduction. However, some recipients or their email service providers have decided to reject unsigned emails in general. This puts pressure on all senders to also sign their emails, as otherwise they will no longer be able to communicate with these recipients by email.
With DKIM, the sender decides which parts of an email to sign and which not to sign. The list of parts contained in the signature is stored together with the signature in the DKIM-Signature: header and is not stored centrally in the DNS. This makes it possible to sign each email differently and, for example, to use a different configuration for some recipients.
The From: header must always be signed. However, it is strongly recommended that you also sign Date:, Subject:, Reply-To:, Sender:, all MIME headers, all content headers and the actual content of the email (body). This is because if an attacker gets hold of an email with a valid signature, they can change all unsigned parts without invalidating the signature. An email in which only From: is signed would then correspond to a blank cheque and should therefore be avoided. In the Intra2et system, several lists of headers to be signed are predefined in the menu "".
In addition to the list of signed parts, the DKIM-Signature: header also contains the so-called selector. The selector is the name of the public key entry in the DNS and can be freely selected. Based on the selector, the recipient knows where to get the key to verify the signature. Several selectors can be used simultaneously for one domain. This makes sense, for example, during a key rotation or when using several email servers.
SPF. is an alternative standard for verifying the sender of an email. This involves storing a list of IP addresses in the DNS that are authorised to send emails for a domain. However, this leads to several problems:
Emails can no longer be forwarded normally as the forwarding server is not on the list of authorised IPs. The Sender Rewriting Scheme (SRS) is provided as a workaround, but this only partially solves the problem and causes new problems.
SPF only checks the Envelope Sender transmitted at SMTP level, not the
From:header displayed by the recipient's email client. The Envelope Sender can only be viewed by the recipient via detours such as the source code display.
Intra2net advises against using SPF due to these disadvantages and recommends using DKIM.
DMARC. is a standard that the administrator of a domain can use to communicate that all emails sent legitimately from this domain must be signed with DKIM or fulfil the SPF requirements. This can be used by the recipient to reject all emails that do not fulfil these requirements. DMARC is therefore based on DKIM and/or SPF.
An important part of implementing DKIM is ensuring that outsiders are not able to obtain valid DKIM signatures. This is particularly relevant in connection with email forwarding, sorting rules, mailing lists, web forms and the like. To prevent this, the Intra2net system automatically blocks all incoming emails from untrusted systems without a valid DKIM signature with your own domain as the sender. This also prevents forgery of the sender address for your own domain.
However, this means that correct signing must be considered for all legitimate email paths before DKIM is introduced. In particular, consider external users who access the email provider directly, devices such as scanners and printers in the local network, emails with status or error information from services such as backup servers, NAS, UPSs, building automation and similar, automated reports such as those from time recording, warehouse management, accounting, etc., as well as emails from external web servers such as web shops, contact forms and similar.
Emails can be signed in the following ways:
Delivery of the email to the Intra2net system from the local network via SMTP, encryption of the connection with TLS, authentication with a valid user. The user must be a member of a group that has the right to authenticate SMTP from the local network.
Delivery of the email to the Intra2net system from the local network via SMTP, the IP of the SMTP client has the right "" (see e.g. ""). TLS and authentication are then optional.
Delivery of the email to another email server in the local network. Although this server does not perform DKIM signing itself, it forwards outgoing emails to the Intra2net system.
Delivery of the email to the Intra2net system from the Internet via SMTP, encryption of the connection with TLS, authentication with a valid user. The user must be a member of a group that has the right to authenticate SMTP from the Internet.
Delivery of the email to the Intra2net system via Activesync. The user must be a member of a group that has the right to use Activesync.
Delivery of the email to another server or service that also signs emails using DKIM. Such services are offered by some web hosting or email providers. This service may use a different valid DKIM selector than the Intra2net system. Such a service must sign via DKIM, the use of SPF is not sufficient for the emails to be accepted by the Intra2net system.
Make sure that every email that uses your own domain in the sender is always sent via one of the above-mentioned channels.
Proceed as follows to sign emails with DKIM:
Make sure that the requirements from Section 14.8.4, „Prerequisites for use“ are met and check all legitimate email paths for your own domain.
Create a new key of the type "" in the menu "". Choose any name for "", but limit yourself to lower case letters and do not use any spaces or special characters apart from the hyphen. A key length of 2048 bits is recommended as a good compromise between security, computing time and data size in the DNS.
Create a new profile in the menu "". Select your own domain as the sender domain and use the DKIM key you have just created. We recommend starting with the standard list as the list of headers to be signed.
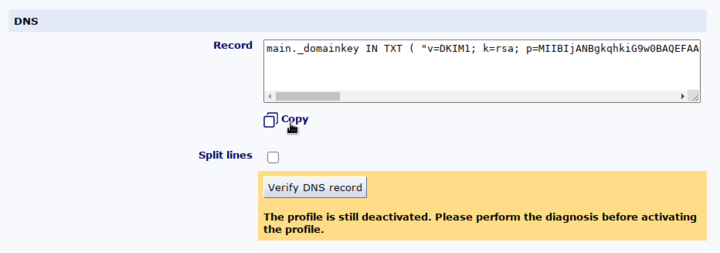
Be sure to leave the profile deactivated first and save the settings. After saving, the required DNS entry for the selector is displayed at the bottom of the menu.
Go to the administration portal of the provider responsible for the domain. This is usually the provider who is also the web hosting provider. There, open the DNS administration for the selected sender domain.
Add a new entry, host name or record of the type
TXT. The name for the entry is the selector with._domainkeyappended, as it is displayed in the menu of the Intra2net system under "" at the front.You can also copy the content of the entry from the Intra2net system display. The exact format required differs between DNS providers. This is because the required entry is longer than 255 characters and must therefore be split according to the DNS standard. Some DNS providers perform this separation themselves, while others require the user to do this. You can use the "" button to display both variants in the Intra2net system. There are also differences between the DNS providers as to whether or not the quotation marks must be included.
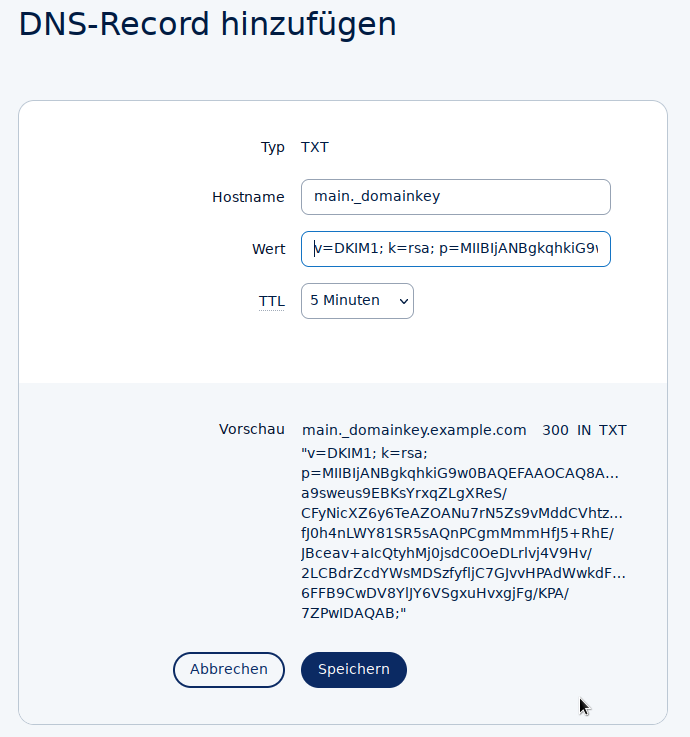
Menu of a DNS provider as an example. The appearance varies depending on the DNS provider.
If the DNS provider gives you the option to do so, then first use a short TTL (time-to-live, validity period) for the DNS entry, e.g. 5 minutes or 300 seconds. In the event of a configuration error, this allows you to correct it immediately without having to wait for the incorrect entry to expire.
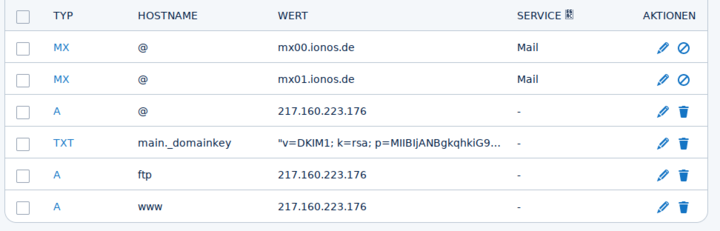
Save the new DNS entry in the interface of the DNS provider and wait until the new entry is published on the DNS servers. In most cases, this is completed after a few minutes, but the exact duration varies depending on the DNS provider.
In the Intra2net system, click on "" and start the DKIM diagnosis. The Intra2net system then checks whether the DKIM entry can be retrieved correctly in the DNS. In the event of an error, see Section 14.8.5.1, „Solving DKIM configuration errors“.
Once the diagnosis has been successfully completed, you can activate the new DKIM profile in the menu "". From then on, all emails with the configured sender domain will be signed and unsigned emails from this domain will be blocked if they do not come from a trustworthy system.
If the diagnosis fails, check the following points depending on the exact error message displayed.
The DNS entry was not found:
First check whether the entry has not yet been updated by the DNS provider. Depending on the DNS provider, this can take between a few seconds and several hours. This should be described in the documentation or administration interface of the DNS provider.
Check next whether the sender domain is also used locally or whether there is a forwarding to it. In this case, the responsible local DNS server is also displayed in the diagnostic output. It is recommended that you also store the DKIM entry in this local DNS server. In this case, however, the diagnostics can only check the entry in the local DNS server and not the one visible to others on the Internet.
Compare the exact spelling of the entry / host name and the correct type "TXT" displayed in the Intra2net system with the data from the DNS provider.
Syntax error or incorrect public key:
Compare the content of the DNS entry between the data displayed in the Intra2net system and that of the DNS provider. The data there must be identical. Pay particular attention to the beginning and end as well as spaces.
If the DNS provider's administration interface provides for several lines, then use the representation with split lines, if it only provides for one line, then without.
Try omitting or adding quotation marks at the beginning and end.
The DNS provider's administration interface may offer the option of displaying or downloading the complete DNS zone file for diagnostic purposes. This can be helpful to recognise transmission errors. A standard-compliant zone file should contain the entry exactly as it is displayed in the Intra2net system with activated "".
Please note that if you retrieve an entry created once from the DNS provider and then change it there again, the old value is normally still stored temporarily in the DNS cache for the stored TTL / validity period. You should therefore wait for the TTL to expire before restarting the diagnosis.
Depending on the DNS servers used, you can avoid this waiting time by clearing the DNS cache of the Intra2net system in the "" menu. However, this is only possible if the Intra2net system queries the root name servers as an independent DNS resolver and does not use other DNS resolvers.
After activating DKIM for a sender domain, the Intra2net system must block all emails that claim to come from this domain but are not DKIM-signed or come from a trusted system. This is necessary to prevent signature fraud, see Section 14.8.4, „Prerequisites for use“.
Emails blocked in this way end up in the DKIM/DMARC quarantine by default. This quarantine can be found under "". The emails can be viewed and analysed there and emails that have been incorrectly filtered can be released again.
You can control the behaviour of the filter under "". It is recommended that these emails are first quarantined for a few weeks after the introduction of DKIM. During this time, the administrator can ensure that all email paths of their own domain are actually configured correctly without emails being inadvertently rejected and deleted. In the event of an error, these emails can then be forwarded via one of the paths described in Section 14.8.4, „Prerequisites for use“.
If the Intra2net system retrieves incoming emails from an external email provider via POP (see menu ""), the quarantine must be used permanently, as the emails to be blocked have already been accepted by the email provider when they arrive at the Intra2net system. It is then too late to reject them at SMTP level.
If incoming emails from outside are received via SMTP and the MX record of the email domain points to the Intra2net system, it is advisable to switch the action for unsigned emails to Reject after an introductory period of a few weeks. The notification emails to the administrator for quarantined emails will then no longer be sent.
Lists with the email headers to be signed can be configured under "". It is normally recommended to use the predefined standard profile, as it contains all relevant headers and makes it very difficult for a potential attacker to falsify emails or misuse existing signatures.
However, it can happen that a server legitimately changes emails between the sender and certain recipients, causing the DKIM signature check to fail at the final recipient of the email. This happens, for example, when labels such as "[external]" are inserted in the subject line or a mailing list is used that inserts its name in the subject line or appends brief instructions for use to the email text. For these cases, the Intra2net system offers the option of defining exception rules for certain recipients and signing fewer headers there.
First select a suitable list of headers under "" or create a new one. Then go to the menu "" and create a new recipient profile. Enter either an entire recipient domain or a single recipient email address. Select the desired header list and save.
The setting stored in the recipient profile is then used for all emails that are to be sent to the set recipient email address or domain and whose sender address is in a domain for which a DKIM profile is active. This setting takes precedence over the settings for the sender domain.
As the sender server can freely select the list of headers to be signed, no changes need to be made to the DNS or the selector.
In principle, the key belonging to a DKIM selector can be used indefinitely. In some cases, however, the key should be replaced with a new one immediately:
Misuse of the key by others is clearly recognised or suspected
A server on which the private key was stored was infiltrated by unauthorised persons or at least suspected of having been infiltrated
An employee who had access to the private key has left the company
A service provider, such as an IT service provider, web hosting provider or email provider, with whom the private key was stored, has been cancelled
In addition to these events, it is recommended to rotate the keys every 1 to 5 years to prevent the key from being broken with a lot of computing power and to adapt the key length to the current state of science and technology.
To rotate the key, proceed as follows:
Create a new key of type "" in the "" menu. Use a different selector than for the previous key.
Create a new profile in the menu "". Enter the same sender domain, use the new key and be sure to keep the new profile deactivated first.
Also configure the new DNS entry with the DNS provider, leave the previous DNS entry there and then start the DKIM diagnosis. See Section 14.8.5, „Configuration“ for a detailed description.
If the diagnosis was successful, activate the queue in the "" menu.
Deactivate the previous DKIM profile and activate the new one. Leave the previous profile in place and do not delete it yet. Both changes are first queued and do not take effect immediately.
Now execute the queue to switch seamlessly from the old to the new profile.
As emails signed with the old profile may still be in transit and must be able to be checked later by the recipient, the profile and the associated DNS entry must remain in place. The earliest possible deletion date is displayed in the menu "".