If you have created new certificates yourself, they will not be known on the client. The client software will therefore warn you of a certificate from an unknown Certificate Authority.
Establish a connection and install the certificate on the client. The program should no longer warn of invalid certificates during the following sessions.
The following describes how to install the Intra2net system certificate onto the Windows certificate system. Note that some programs (e.g. Mozilla Firefox) have their own certificate system. If such programs are to be used with the Intra2net system, the certificate must also be installed there.
Open the web interface of the Intra2net system. It may be necessary to temporarily accept the (still) untrusted certificate and open the connection.
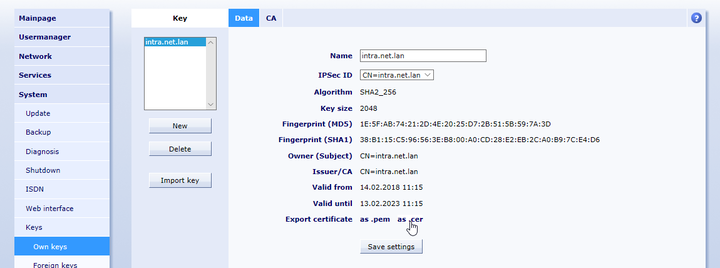
Open the System > Web Interface > Security menu and click on the magnifying glass icon beside the "" option.
Export the certificate"" and download it.
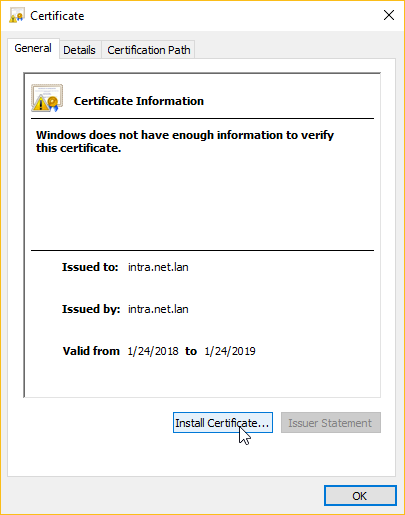
Double-click the newly downloaded file in Windows Explorer to open it.

In the certificate display, click "". If this option is not available, ensure the necessary administration rights are being used.
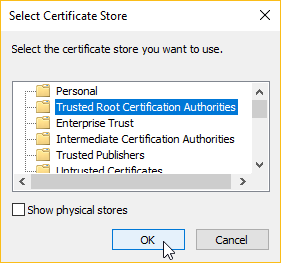
A certificate import wizard will open. Click on "" to select the desired location for the certificate.

Select "Trusted Root Certification Authorities" as a certificate location.
Close the wizard. The operating system will display a security warning. Confirm that the installation of the certificate.

Close the Internet Explorer.
Open Internet Explorer again, this time without administrator rights, but with normal user rights.
Open the Intra2net system interface again. No certificate warning should appear now. A padlock symbol will be displayed next to the URL.

If any problems are encountered with the installation of the certificate, please review the following points:
In Internet Explorer open "", "" tab, and click "". The certificate of the Intra2net system should be listed under the "Trusted Root Certification Authorities" tab.
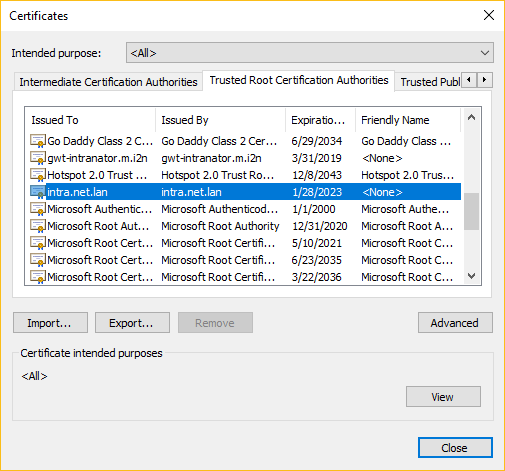
If the certificate is not displayed there, check if it is not in another certificate location. Then reinstall it once again ensuring that "Trusted Root Certification Authorities" is the selected destination.
Some versions of Windows have a known certificate location error. For more information, see http://support.microsoft.com/kb/932156.
We have observed that some systems have problems with the owner of the certificate location, in connection with imaging systems. In this case, the registry editor must be used to change the owner of this key to the current user:
HKCU\Software\Microsoft\SystemCertificates\Root\ProtectedRoots. Then assign read access rights for the user.
If the client PCs are managed with an Active Directory, they can be used to distribute the certificate of the Intra2net system to all of them.
Export the relevant certificate as a .cer file from the Intra2net system under the menu System > Keys > Own keys.
Then follow Microsoft's instructions for distributing the certificate: https://docs.microsoft.com/de-de/windows-server/identity/ad-fs/deployment/distribute-certificates-to-client-computers-by-using-group-policy
Select "Trusted Root Certification Authorities" as a certificate location.
The steps outlined there will create a group policy. Assign this policy to the users and computers on the local network.
After the group policy is deployed, it normally takes up to 2 hours for it to become active automatically on the client PCs. The command gpupdate /force can be used to start an immediate update on a client PC. A few minutes later the certificate should be available in the certificate store.